My Process:

Like anyone, when I make a 3D printed project, I have a multi-step process. Here's a chronological list of things I do for each project so you know what you're paying for:
-
Model Editing:
When you send me the 3D model, more often than not I'll have to edit it so it can be printed in an optimal and efficient way. When I say editing, I don't mean I'm changing your model to look different. I want your model to look exactly how you sent it to me once it's completed. When I edit models I often: add a hole through the center of the model to make room for a metal or wooden rod, slice the model into manageable pieces that are later connected, and remove any digital artifacts that aren't intended to be printed.
2. Aquire Additional Materials:
Some projects have additional details that aren't represented well in the plastic medium. For example if you have a sword that has a leather grip around the handle, you can request a leather or fabric substitute to be wrapped around the handle instead of the leather being represented by plastic. During this step I also acquire an appropriate wooden or metal rod if needed.
3. Printing:
Once everything for the project is gathered, the print begins. For those of you that don't know, 3D printing takes a long time. I run my printer on a slightly slower speed as well to avoid potential misprints. Misprints are also the reason I don't set guaranteed delivery dates. You never know what could go wrong in the printing stage. Depending on the size of your project, your print could take a couple hours or a couple weeks to fully print.
4. Print Cleaning:
Once all of the pieces of your project are finished printing, I remove them from the print bed and begin the cleanup stage. During this time I remove any support materials your print used, and try to clip away and smooth out any imperfections that may have occurred during printing.
5. Gluing:
After the cleanup, it's time to stick all of the pieces together. The glue I use delivers a permanent bond to the plastic pieces effectively making them all one piece. If your project includes a metal or wooden rod, glue is also used to insert it. This creates a project that is quite stable and hard to snap.
6. Sanding:
Sanding a project removes most of the obvious layer lines from the print. Layer lines are tiny grooves in the plastic that are a byproduct of the printing process. Typically, unless you knew about 3D prints or how a 3D printer works, you wouldn't notice the layer lines in a project, especially after coats of primer and paint have been applied. Sanding is also a grueling and time consuming process. I often don't sand areas of a projects that are filled with small details because sanding them could effectively erase them.
7. Gap Filling:
There are almost always tiny gaps that are present between pieces of a project after they've been glued. During this step I fill them in with a putty and smooth out those edges.
8. Priming:
During this step I apply multiple coats of primer to the project to ensure the colors are uniform when I begin painting.
9. Second Sanding / Second Priming:
Sanding the project down a second time after gap filling and priming creates a smooth surface on the previously sanded areas. After this, I re-prime the project to get the ideal painting surface back. Second sanding and second priming aren't always necessary for a project to look its best.
10. Painting:
After all of the previous steps, it's time for painting! Using the reference images you provide, I do my absolute best to make the project look exactly how you want it to look! I usually apply three or more coats of paint, and a fourth and fifth coat are designated for details, highlights, and weathering.
11. Clear Coat:
With the painting done, I add a few layers of clear coat. The clear coat can be matte or glossy depending on the intended material of the project. The clear coat ensures the paintwork doesn't easily rub away or chip if the project is handled.
12. Details:
This is the final phase of the project's construction there I add the additional materials I acquired in step two if there are any.
13. Shipping:
I use Etsy as an easy platform for shipping.
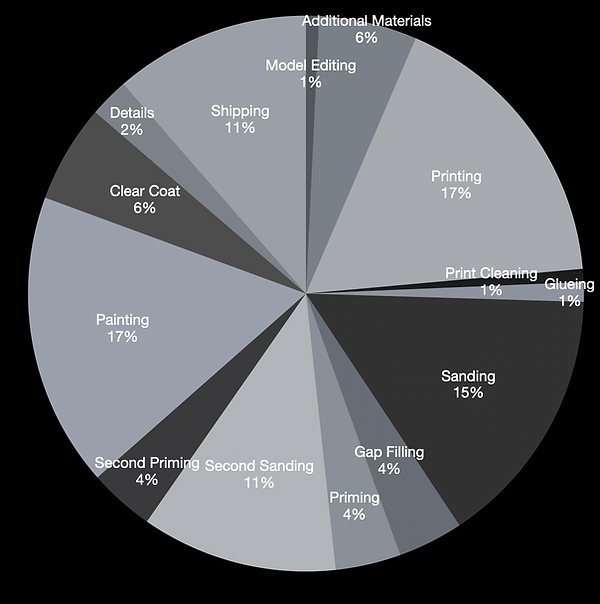
Below is a pie chart that gives an average on approximately how much money and work goes into each of the steps in my process in comparison to the other steps. Obviously these numbers can change drastically if you request a project that requires more or less work in any step. If you live in another country for example, the shipping cost will go way up. Another example would be if your project requires no additional materials then that part of the cost is completely removed.
It's important to note that no matter how much effort and time is put into a project, no project is perfect. 3D printing is prone to errors and missteps. 3D printing as a hobby has not been perfected by any means, and because of this I hope you understand if your finished project isn't absolutely perfect. My process has all of these steps to ensure you get the best possible product I can provide.